Please Read: Archives

Hi Everyone,  odds are good that you’ve been directed to this site from one of my books.  The Road Home and The Day After (sequel to The Road Home) both pointed to www.PreparedBlog.com.  Personal Emergency Communications – Staying in Touch Post-Disaster pointed to www.EmergencyCommunicationsBlog.com.

The Road Home
The Day After (Sequel to The Road Home)
Personal Emergency Comms

And there was one more blog… www.HamRadioBooks.com, in which I wrote several reviews of radio-focused books.

They’ve all been migrated!  And now everything is here, in one, convenient location, for your reading pleasure :-).  And it will be here for the foreseeable future.

(Please note that the publication dates for the articles were reset when I migrated the content. Apologies if that mattered to you for any reason.)

Enjoy, and for the radio folks, 73!

-Andrew, AB8L


CERT Day 9 – Final Exercise

This is it! Our final exercise!  (Note: In order to not ruin the fun for the next CERT classes that happen, I won’t give away the good stuff, so thosee folks can learn from their mistakes too! :-))

It was a cool and not rainy (yes!) Saturday morning, and I could feel the excitement in the air as I walked up to the group of classmates who were milling around, waiting for things to get rolling.  I signed in with the instructors and waited to get rolling.  It didn’t take long.

We had selected an Incident Commander (our “IC” – do you remember ICS from Day 2?) in our last class session, and she was ready to go.  After we arrived for the exercise, we all chose teams (search, rescue, medical, runners, etc.) and were ready to go.  One of the instructors told us “We just had an earthquake”, and the drill was on!

And then things really slowed down.  Me and another guy were tasked with examining the outside of the building that we were using for our scenario, and that took a few minutes.  We saw nothing significant.  Apparently the instructors didn’t think it was important to heighten the realism by starting a couple fires, taking a sledgehammer to the gas line, or breaking out the windows.  Oh well – maybe when the read this article they’ll do that for the next class.  (And the gas company could to their own “fix the vandalized gas line” drill at the same time :-)).

After that, we knew that the building appeared to be structurally safe on the outside, and other teams of searchers made their way inside.  And the slowness continued.  Since I was in and out and helping search and doing other chores, I obviously didn’t see everything that was going on, and certainly wasn’t able to view things from the IC’s or instructors’ perspective, but I didn’t need to see everything to realize a few things as the scenario progressed:

  1. Injured people had to wait a long time to get treatment, even when injuries were life-threatening.
  2. People who could have lived “died” instead because we took too long to get to them.
  3. It was difficult to maintain communications to and from the IC, even when using runners (and since our class was pretty big, it was even harder!)
  4. Orders changed midstream, either because of rumors spread when connecting with other search or rescue teams, and in many cases because people on teams simply decided to do something else after they got started doing one thing.  It turned out to be very easy to get distracted by crying victims, a fire or chemical spill (or in our case, signs that indicated these situations), and many other things.

This was what they call a “dynamic” environment, not because the quake was still happening or because pieces of the building were still falling down, but because we had introduced a whole new batch of humans to the overall equation, and all of us rescuers kept changing things.

The IC had a tough job!  Not only did she only have runners for communication, she needed to keep track of who was where, whether all her teams were safe, and had to do her best as victims kept dying off.

I’m not pointing this stuff to point blame to anyone — our class did a great job!  But instead I want to point out that in an environment like this, it will be confusing, and that confusion could potentially result in additional pain and suffering.  Such is the nature of a natural disaster.  Now you won’t be surprised.  (I know – if you’re reading this type of article in the first place, such a statement is unlikely to be a surprise!)

Here’s another interesting thing I noticed.  I died!  That’s right.  I broke one of the simple rules: “Never get separated from your buddy”.  Easy, right?  Not in this case.  We were a three-person team, and we had stopped to rescue an injured girl.  After a little hemming and hawing, I decided that I could easily carry her in my arms, downstairs to safety and treatment.  We talked about what the other two should do. I looked away for a moment, saying something about us needing to stay together, and before I knew it, they were off on their own.  I headed toward safety anyhow.  (At that point, I think the only alternative that would have kept me from breaking the rules would have been to drop the victim and catch up with them.  That seemed silly, so I didn’t.  My mistake.  An observer looked at me and said “You have no buddy – you just died.”  The fact that this observer also seemed to be encouraging us to split up right before my two buddies took off didn’t help anything.  Maybe he was playing devil’s advocate – I’m not sure. And it doesn’t matter.  The rule was simple, I broke it, and I was dead.  (It was only a 15-minute “time-out” and then I got to play some more, but the lesson was still quite clear.)

U.S. Army Ranger tab
Use the buddy system, like the Army Rangers do!

What does this prove?  Even in this contrived situation, it doesn’t take a rocket surgeon to realize that in the midst of bad things, more bad things can continue to happen! Did you read about search and rescue from Day 7? Can you imagine listening to someone crying for help inside a collapsed building, but knowing that if you went in you could possibly cause further collapse (injuring your victim further or killing him/her) or make matters even worse by injuring or killing yourself?  This was the type of situation our instructors were trying to avoid.  If you have your buddy with you, you’re likely to live longer when your environment is in turmoil.  Elite military units do it for the same reason, and we should too.  Have you ever heard of a Ranger Buddy?  Go to Army Ranger School, and you’ll learn about it (or just keep reading this article – much easier).  At Ranger school, you and your buddy are inseparable, and watch each other’s backs. And if you do get separated somehow, you can expect at leat lots of pushups and some yelling.  (No, I was not a Ranger, but I was in the Army, and have this on good authority :-).)

A situation like this disaster scenario is HARD to deal with. The class did a great job, especially for our first drill. The biggest lesson I learned is that in order to not make a worse disaster of an existing disaster, I and the rest of my CERT team will need practice!

The good news is that we have another drill coming up early next year, and I’m looking forward to correcting some of my own mistakes and hopefully adding value to the rest of the group.

Let me sum up this experience (at least for now – I’ll probably write about upcoming drills too) by saying this:

  • Taking a CERT class is good, but it’s only a very basic preparation for a disaster.
  • Participating in additional drills will help cement your training (if I wrote clearly, this is obvious to you already).  If you don’t exercise these muscles, they’ll waste away.  Don’t let all that time you invested in training go to waste!
  • If you haven’t taken a CERT course, do it.  It won’t hurt. It will help.
  • Get out there an do something!

Thanks for reading,

Andrew


CERT Day 8 – Exercise Preparation

This was our last class in the classroom, and it was a pretty good one.  Of all the classes, I like this one best because I could re-learn or practice many of the most important things from all of hte previous classes, in preparation for our upcoming “field exercise”.

We had a few stations to rotate through, including head-to-toe assessment and bandaging/splinting.  We also had a “rapid triage” station, at which we had 10-15 seconds to pick up a card, read the condition of a victim, and write down our assessment (green, yellow, red, black).  It wasn’t easy!  But it was a great way to review quickly, and we went throught the scenarios quickly as a class afterwards.

Additionally, we reviewed a lot of the highlights from previous classes in a big slide deck, along with some new, supporting material.  Let me take this opportunity to say again that our instructors did a fantastic job making sure we had useful, interesting content to review.

Especially to prepare for our upcoming exercise, we spent some more time on reviewing building layouts and discussing how we would conduct search and rescue operations in a variety of situations.

Of course, none of this could have prepared us for the mind-bending insanity that was our Final Exercise.  Not many survived that day, unfortunately….

CERT Day 7 – Search and Rescue

Light search & rescue.

The “rules” for light search and rescue, for example, trying to help people who may be trapped in a building after an earthquake (or anything else that could knock a building down) are as follows:

1) Be safe!
2) Do the greatest good for the most people, vs. dedicating all of your resources to solving one problem of many

Of course, before you run willy-nilly into a building to rescue someone, you need to determine whether you will die if you do that :-|.  You must evaluate the scene and see how dangerous it is.  One of the first things to do is to look at the damage.  If it’s light or medium damange, you may consider entering, searching, and rescuing as needed.  If the damage is heavy, don’t go it.

Earthquake damage in basement
Earthquake-damaged basement - would you go in?

“Don’t go in and rescue the crying person?  That’s terrible!”   Yes it is.  But it’s not as terrible as you going inside and possibly:
1) Causing the building to collapse further, making the situation worse for the trapped person or
2) Getting trapped yourself, making the situation worse for everyone else you could otherwise be helping, as well as for yourself!

What do you do when you encounter heavy damage and someone making noise inside?  You say “I can’t come in. It’s too dangerous. We’ll send in someone with the right training as soon as we possibly can.”  Those are the unfortunate, frustrating words you’ll get to shout to some poor soul who wants out.

In addition to learning more about damage and search techniques, we learned a bit about cribbing.  What is cribbing?  If you look up the noun, it’s defined as a temporary wooden structure used to support heavy objects during construction, search and rescue, etc.

We also used it as a verb: to build up those wooden supports while levering something heavy off of a victim.  This comes in handy when you have a piece of wall or bookshelf or whatever pinning a victim down, and some other pieces of wood to use as a lever and cribbing to free him or her, in an emergency.  It’s not too difficult to imagine a situation like this after an earthquake, when the fire department is too overloaded to help, and it’s a life or death situation.


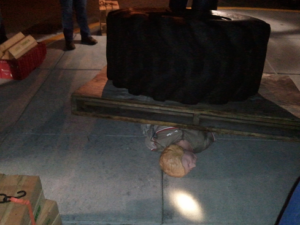
Cribbing exercise in CERT course
Cribbing Exercise: Rescue the Trapped Victim

As you can see in the picture here, we have a victim trapped under a pallet with a huge tire on top of it.  The piles of wood are pieces of 2×4, but for purposes of emergency cribbing, they of course don’t have to be as pretty as these.  What did we do next?  After our FD captain explained the basics, we used a lever and pieces of wood to slowly and safely (it didn’t fall back onto the victim or any of the rescuers!) raise the pallet off of the “victim”, so we could pull her out and do first aid.  To see what the end result looks like, take a CERT course! 🙂

Do I expect I’ll be doing any cribbing soon?  No.  Is it more likely that I’ll need to use a fire extinguisher effectively?  Yes.  But it’s also a good tool to have in your toolbox, and I know a lot more now about it than I did before.

As with everything we do in our CERT training, this will not make me an expert Search-and-Rescue operator, or a carpenter, physician, or engineer.  But it does give me some good ideas for how I can help in a pinch.


CERT Day 6 – Fire Prevention and Suppression (We Extinguished Real Fires!)

On our 6th day of CERT class, we reviewed fire safety and learned how to effectively use a fire extinguisher to put out a real fire.

Let’s review what everyone knows:  Fire is really, really dangerous.  Not only it is hot, which hurts, it also makes smoke, which is often full of all kinds of other terrible things that can kill you other ways.

We covered a few basics, e.g., use the buddy sytem when fighting a fire, CERT teams should only be fighting small fires, make sure you wear a mask, leather gloves, your green CERT hard-hat (or whatever hard-hat you have handy), etc.  Then we spent a fair amount of time reviewing basics, e.g., fire requires heat, oxygen, and fuel.  While that may seem boring and basic for a third grade science class, there is one interesting aspect to one part of that triad.  The type of *fuel* makes a difference when it comes to how you want to put it out.  Your fire extinguisher should be rated for putting out a fire that’s buring a certain type of fuel.

The fuels determine the class of fire:

  • Class A: Ordinary combustibles – paper, cloth, wood, rubber, plastics
  • Class B: Flammable liquids, e.g., gasoline
  • Class C: Energized electrical equipment
  • Class D: Combustible metal (e.g., aluminum, magnesium)   Metals burn? A common survival fire-starter is a block of magnesium!  You scrape off shavings add a spark, and they burn hot.
  • Class K: Cooking oil, e.g., vegetable oil, fats

The fuel matters.  If you have a class C fire, spraying water on it could actually kill you, or create dangerous, energized puddles, waiting to electrocute whoever steps in them!

One of the biggest causes of fires after an earthquake is a natural gas leak. After an earthquake, shut off your gas, unless you’re absolutely sure you don’t have a leak. One way to tell you have a leak is you see the gas meter dials moving when you aren’t using any gas.

Let’s say you have a fire in progress.  Do you try to put it out?  Here are some questions you need answers to:

  1. Do I and my buddy (buddy system!) have the right equipment? (Especially the right type of fire extinguisher.)
  2. Are there any other hazards? (Your safety is Priority 1!)
  3. Is the building structurally damaged?
  4. Can I and my buddy escape?
  5. Can we fight the fire safely?

We reviewed types of fire extinguishers and how to use them.  They fall into these categories: water, dry chemical, carbon dioxide, and other specialized types. In addition to being rated by the type of fuel on which they should be used, some have another number to indicate the volume of extinguishing agent.

A CERT Firefighting team in action
We go to use them!  The nice part is that we knew what the fuel was (liquid) and had a bunch of fire extinguishers ready.  We practiced using the buddy system, had on our safety gear, and used the PASS system, Pull (the pin), Aim, Squeeze, Sweep.  The only parts that may not be intuitive are #1 – pulling that pin in the first place.  Sometimes people forget to do that in the stress of being near open flame. The other part is the “sweep” part.  You will need to aim at the base of the fire (not necessarily the biggest part of the flames, which is where you may intuitively want to aim) and move the fire extinguisher back and forth along the base of the fire, to ensure you covering it fully.

We continued to put out fires, until everyone got a chance to put out at least one.  The picture gives you some of an idea of what it looked like.  It was dark and a bit rainy, but the flames were big and we were able to put them out.  It was fun, and a new experience for most of us.

Reading this is not the same as taking a CERT course and fighting a real fire with a real fire extinguisher.

Go take a CERT course! 🙂

CERT – Day 5 – Terrorism/Hazmat and Disaster Psychology

Day 5 – Terrorism, Hazardous Materials, and Disaster Psychology

Day 5 was an interesting mix of topics: terrorism/hazmat and disaster psychology.

Terrorism/Hazmat

In the first part, we reviewed procedures for hazmat (hazardous materials) and terrorism.  As far as CERT is concerned, they’re about the same.  Get out.  Easy, right?  Do you feel prepared now to deal with a hazmat or terrorism scenario? I hope not.  Let’s dig a little deeper.  But don’t get your hopes up.  Just as CERT training won’t train you up to paramedic or EMT level, it also won’t transform you into a counter-terrorism expert or professional hazmat responder.  But it will get you thinking!

Since the responses to a hazmat scenario and terrorism are largely similar, we’ll focus on the worse version – terrorism.  We started by reviewing what kind of targets exist in our area. They will be similar in your area:

  • Big business, shopping malls
  • Military facilities
  • Schools
  • Bridges, tunnels, subways
  • Government buildings
  • Water supplies

You can easily think of more targets: anywhere where you can find a lot of people or stuff that people care about.  This should be a somewhat discouraging exercise, and you will probably be able to think of many vulnerable areas. Isn’t it great that we don’t have to deal with terrorists frequently?

The types of terrorist attack are described with the acronym “CBRNE”, which stands for Chemical (e.g., chlorine gas), Biological (e.g., anthrax), Radiological (e.g., distributed radioactive material), Nuclear (e.g., a nuclear explosion), and Explosives (e.g., dynamite).

We quickly reviewed signs of potential terrorist activity (before the explosion goes off), and how we should react. You guessed it – call the police and get out.

But let’s say you arrive at a disaster scene, ready to help, and you realize that it’s a hazmat or terrorist scenario.  Again, the guidance is simple: get out.  But how far do you go? The fire department captain who taught this portion of the course gave us an easy-to-follow rule, one of the pearls of wisdom we received on this day:

If you can hold up your thumb, and you can still see the scene, you are too close.”  He told us to keep backing up until you thumb covers up everything.  Not just “get out”, but “get really far out.”

And we briefly covered what to do if you need to shelter in place (aka “hunker down”).  Assuming there is a cloud of danger (gas, radioactive material, whatever) heading your way, you’ll need to shut off your air conditioning (or furnace, or anything else that draws in outside air), cover any openings to the outside with plastic sheeting (sealed with duct tape), and turn on your radio.  Obviously, you’ll want to seal door edges, any vents or heater ducts, and any other cracks in the room that would allow air to enter or exit.

Do you need to worry about suffocating?  Not in the short term.  There is a lot of air in even a small room (though you probably don’t want to choose a closet).  I won’t do the calculations here.  Do a little research and you can see for yourself (or let me know if you’re interested and I can write something up and post it).

A couple more caveats concerning contamination:

  • Basic decontamination:  remove all clothes, throw them away, and wash thoroughly
  • Don’t go into a contaminated area (CERT training doesn’t teach you how to survive this!)
  • Don’t become part of the problem – leave any hazmat or terrorism response to the professionals


Disaster Psychology

This next section was fascinating, and taught by the city chaplain. Don’t let that throw you! Not only did he not push any religion, he even cussed a little. He was not your typical religious figure, but he was a down-to-earth, slightly gritty, and helpful guy with some very important things to say.

“80% of trauma in a disaster is psychological.” He said this more than once, and we reviewed some examples. As I’ve said in other articles, this is heavy material, and you can expect that people will 1) act irrationally and 2) they may need some help recovering, or getting on the path to recovery.

What is the CERT responder’s role in dealing with people going through various stages of grief or otherwise dealing with their trauma? The chaplain had some simple (simple to discuss, much harder to implement effectively, but it’s the right direction) guidance:

  • We (whoever has experience) do support, initial care in the first minutes, not long-term counseling
  • Just acknowledge people’s grief – that’s all you can effectively do
  • Help them make little decisions around what to do next
  • People will be distressed, overloaded, and some will shut down

The people in real distress can get real comfort from talking with someone, and maybe that someone is you. Simply by being there to listen, you could make a big different to someone in need by answering these three, simple questions:

  1. Does anyone know I’m here?
  2. Does anyone know that I’m hurting?
  3. Does anyone care?

Hint: Answer “Yes” to all of them. And I hope you’re telling the truth!

What do you NOT want to do? Tell someone that “It’ll be OK.”  It won’t be OK – something really bad has happened!  “It’s for the best”, “Don’t worry about it”, or other such advice that won’t help people.

The chaplain added “I don’t tell them that we’ll get things back to normal. Things will never be normal again. They will move toward a new ‘normal’.”

Remember, after triage and first aid, expect that some people will need “psychological first aid.”  This short article can’t prepare you, but a CERT class should give you a little more info and help you learn some of the basics.

CERT – Day 4 – Disaster Medical II – More Basics, Water, and… Poop

Day 4 – Disaster Medical Part II – More basics, Water, and… Poop

Much of day 2 of Disaster Medical was pretty similar to the first.  We had more “what if” questions, and covered some first aid basics, as well as some unique material.

The first-aid-related material was around doing a head-to-toe assessment, using the standard “DCAPBTLS” system, checking for: Deformities, Contusions, Abrasions (scrapes), Puctures, Burns, Tenderness, Lacerations (cuts or gashes), and Swelling. In addition, we reviewed basics for cold and heat-related injuries, burns, bites and stings, and wound care. One more reminder (probably not the last!): if you haven’t taken a first aid course, you should, and you can cover this material there.

But there was some interesting and less common material in this section, specifically “Public Health Considerations” and “Disaster Medical Operations”.  I’ll start with the least interesting first.

In the Disaster Medical Operations section, we learned some fundamentals about how to lay out what amounts to a field clinic or hospital, with descriptions of how to lay out a medical treatment area, as well as separate areas to cover triage, transport, morgue and supply. You read right – we need to be able to set up a morgue. I hadn’t thought about that before, but it will be necessary, and it’s worth thinking about. I won’t dig into details here – it’s still up to you to take the course.

The last area I’ll cover in this article is one of the more interesting ones in my opinion:   Public Health Considerations. We reviewed some guidelines here on purifying water. This is something everyone should know. If you don’t have water, you’re in big trouble. If you drink contaminated water, it could be just as bad as having none, after the parasites or bacteria are finished ravaging your insides. You must know how to purify water.

The technique covered in this course is to use bleach. Here is the formula:

  1. Use 8 drops of unscented (no “lemon scent” or “fresh scent”) bleach into one gallon of water if it’s clear
  2. If the water is cloudy or dirty looking, double the dose (12 drops)
  3. If the water doesn’t smell like bleach after 1/2-hour, then add 6 more drops and wait 15 more minutes.
  4. If it still doesn’t smell like bleach, repeat #3 until it does.

There you go – pretty simple.

But be careful. Bleach doesn’t last. If you have bleach that’s a year or two old, it may not work at all. You should ensure you have a fresh jug of bleach on hand. Or, if you want to get a little more hard core, you can get calcium hypochlorite (aka “pool shock”, used to clean pool water) and add water whenever you like, and you’ll have instant bleach with which you can treat your water.

There are many other methods available for filtering and purifying water, and you should definitely investigate them. We only covered the bleach option in this course.

And last but not least, we spent very little time on this topic, but it’s worth bringing up, and if you don’t know what to do with it, you’ll be in trouble. You’ll need a plan for poop. Yeah, that’s right. What will you do with your poop? If your toilet doesn’t flush, where will you put it? Hint: *NOT* in the toilet. You’ll just have to fish it out later – yuk!

Here’s what it says in the book: “Burying human waste. Select a burial site away from the operations area and mark the burial site for later cleanup.” What? That’s it? Well, sounds like a piece of cake. But it’s not. Are you going to lean over the burial pit every time you need to go #2? No.

In the old days, folks would dig a hole and build a shack over it, the common outhouse. If nothing else, you’ll need a trench and something you can sit on, and you’ll need to shovel dirt over your mess when you’re done, to prevent flies from spreading bacteria everywhere. But what if there’s snow falling outside? Or it’s pitch-black out and you’re out of flashlight batteries? Will you be stumbling around in the dark, near the hole filled with…? Not a good idea.

Consider an empty five-gallon bucket and another full of dirt or cat litter. Do you business, cover it up, and put the lid back on. That’s a step in the right direction.

This isn’t an article on how to manage your poop if your toilets go away, but instead I intend to get you thinking. In a disaster scenario, you should have a plan for how to use the toilet inside, when your normal toilet isn’t available. If you have that plan, you will be much more comfortable. Think about it, and give it a lot more thought than “you’ll bury it somewhere, sometime.”

Stay safe!

CERT Day 3 – Disaster Medical – Who Lives and Dies

Day 3 – Disaster Medical

Things are picking up! We covered the first half of our Disaster Medical material. All told, we covered triaging in a disaster scenario as well as some basic first aid.

Triage is interesting. What happens in triage? You essentially decide who lives and who dies. Wow. Thank goodness we get training on this, and don’t have to completely figure it out on our own if a disaster happens! Yeah, it would still really suck, but it will suck a little less after having gone through this.

The quick version, at least in our county, is that you’ll have to tag people (with colored, non-sticky tape like surveyor’s tape, which you tie on somewhere ) green if they’re walking wounded, yellow if you can wait to treat them further (not life-threatening injuries), red if they have life-threatening injuries they could recover from with immediate treatment, or black and white (stripes) if they are 1) dead or 2) they’re going to be dead soon and there’s nothing you can do about it.

Again, this is heavy stuff to consider. Why subject yourself to these morbid notions? Because if the time comes when you do need to triage, you will have at least a little training under your belt. It’s better to sweat in training than bleed in war, they say. You might as well think now about what tough decisions you might need to make (and this doesn’t only apply to triage), because they will only get harder to make later, in an emergency.

We got to do a hands-on exercise, and kudos to our actors. Some were appropriately noisy (which I expected, but still added to the stress of making the right call) and some were surprisingly quiet (which I guess wouldn’t be a big surprised if they were shell-shocked, now that I think about it). We had to evaluate them on the spot, make a call (green, yellow, red, black & white), and move forward. We directed the walking wounded back to the door we came in through. It was a good learning experience. And just reading or talking about it wouldn’t have been nearly as good of an exercise. Doing this was important, and I know there is more “doing” to do. I’m looking forward to it.

As far as the first aid material goes, you should know this stuff already: how to not contaminate yourself with potentially deadly goo by wearing gloves, mask, and eye protection (if you have them), how to stop bleeding with pressure, putting on a bandage, rolling someone into a recovery position, and more. If you don’t know it, either take a CERT class, or better yet (as far as first aid is concerned) take a first aid and CPR course through your local Red Cross or whoever else teaches it! There is no good reason not to do this. Even if you’re handicapped, they will accommodate you. Please do it.

Another thing I liked about this class: even after taking an EMT course and a variety of first aid courses over the years, I never had to take gloves off when they were actually covered with muck (the goal being to not get any on your skin as you remove the gloves). I won’t give away the teacher’s secret (hint: it’s used in a mocha), but our gloves were actually coated in muck, and we learned whether our technique for removing them worked. A good test, indeed!

CERT Begins – Days 1 and 2 – A Critical Question is Asked

Day 1 – A Critical Question Asked


CERT class officially begins!

We started with paperwork. Not too interesting, at first. They handed out some checklists for 3-day kits, waivers, etc. One of them was an icebreaker, a simple set of questions. One of the questions “What are three things you have with your right now that you can use in case of an emergency?”

When the group went through the exercise, the answers were interesting, and it was a good way to start to get to know classmates. Some people thought their cell phones would be most important. Some people thought their vehicles would be most important, especially those with first aid kits. One other guy and I had written down “my brain” as the most important item. I’m sure that will come up later, especially when we cover “disaster psychology” (which I know is coming – I peeked ahead in the manual). This got people thinking, and led to another set of questions.

After filling out a few more forms, we started discussing three-day preparation boxes and what should go in them. After a somewhat disjointed conversation and many random questions (this idea was new to many, which is probably one of the reasons they’re in the class – good for them!), one lady thoughtfully asked “I’m a nice person and there is no way I’d be able to not help my neighbor in a time of need.  What should I do to prepare to help them?”

I’ll be honest – I don’t remember the answer the instructor gave, probably because it differed from what was bouncing around in my head at the time (or maybe my noisy, inner dialogue was drowning her out – that happens sometimes). Here is my answer:

You will need to 1) educate your neighbors, 2) prepare for them (stock supplies that they can’t or won’t), or 3) be ready to listen to them crying when you won’t give up your stores or fix their broken stuff for them. (I’m not taking evacuation scenarios into account in this case.)

Have you done that? Do you know what level of preparedness your neighbors have? Will they become assets or liabilities if a disaster affects your neighborhood? Do you think you should have answers to these questions? I think you should.

Consider these options:

  • The “Map Your Neighborhood” program (more on this later – I’ll discuss my experience doing it in my neighborhood) could be an effective solution.
  • Get to know your neighbors, if you don’t already. This used to be a common practice, but more recently it’s less common, with people moving from home to home more often, especially in more urban areas.
    • How do you do this? You’re clever. If you’re not friendly, pretend you’re friendly. You can find a way. Bake a pie and take it over. Find a way to do something nice, that fits with who you are, your best guess as to who they are, etc. Unless you’re already off to a bad start somehow, they’ll respond in kind and you’ve just kick-started a hopefully productive relationship!
  • And if you’re the gregarious type, throw a block party!

You don’t have to be a social butterfly to see the value in knowing your neighbors. They can be beneficial or a huge burden in a bad situation. Make the choice now, and educate them if they need it. And you’ll learn something in the process.

Day 2 – ICS: Incident Command System

I lumped day 2 into this article because I don’t have a lot to say about it. I have to give credit to our instructor for making it somewhat interesting by using a wedding planning analogy, but when it comes down to it, the Incident Command System just isn’t super-exciting to me.

That doesn’t mean it’s not important. We all need to get along. And by “get along”, I mean that I agree that it is useful to have a common command structure to use in the event of an emergency, along with a common language to describe who has which role, a way for different groups to work together, etc.

If you have any reason to interact with people doing CERT, Search & Rescue (SAR), or any other emergency management organizations, you should learn about the Incident Command System (ICS) because odds are very good that they’ll be using that structure.

The good news is that you don’t have to pay for it. FEMA makes training available online, and there are usually two courses you should review: ICS-100 and ICS-700.

It will take a little time, but it will also give you a good idea of what to expect on an emergency scene if you’re working with local, state, and federal government, and more often now, non-governmental organizations who also choose to follow this common (and relatively simple) set of guidelines.

Take a look for yourself. Don’t expect a page-turner, but do expect to learn at least a little bit.

Taking Training: CERT – Community Emergency Response Team

I signed up for a local CERT course and just took my first class. I knew that much of the content wouldn’t be new to me, although I did expect to learn something new – I always do! And so far I have learned some good things, which I’ll be passing along to you as I progress through the course.

CERT stands for Community Emergency Response Training. Many cities offer courses like CERT through their Office of Emergency Management (or whatever they call it). If you go to your hometown’s website (e.g., Anytown.gov), you can probably find a link to an office that deals with emergency preparedness topics for your area. If your town isn’t big enough, try the county or the state.

If a course is offered but not called “CERT”, don’t worry about it. The goals are largely the same, across the different courses, at least the ones I’ve seen in my area (Washington State). Please let me know if you can’t find anything locally. I would be happy to do a little digging to see what I can find, if you aren’t able to.

Why do you care about my CERT course? I’ll walk you through at least some parts of each class, so that you will be able to determine:

  • Would it be useful for you, friends, or family?
  • What topics are covered?
  • What should you expect to learn?

Such preparedness courses have a lot to offer, and as you read further, I think you’ll realize that if you haven’t taken a course, you probably should.

Here are some additional resources:

I’ll have post several more articles about the training, as I go through it, to fill you in on some of the details. Stay tuned!